|
|
|
|
Text and Photography by Noella Ballenger
Successful garden photographs convey a sense of beauty and intimacy. The viewer wants to feel the sunshine, smell the blossoms, and recapture a wonderful sense of peace and contentment. How can you make your photographs do all this?
1. Learn To See What’s Really There
 Frequently when your photographs come back, you wonder why you took
them. When approaching a scene, take the first photograph just as you always
have. Then, stop and think about what you are seeing and what attracted you to
the scene in the first place. Once you identify that, make it specifically the
dominant feature of the photograph. Try to "boil down" the picture to its very
essence. Ask yourself, what is the subject? How can I emphasize it? What is
unnecessary? How can I eliminate those items? For example, if trying to take a
single blossom or flower center, eliminate all unnecessary flowers, leaves, and
background.
Frequently when your photographs come back, you wonder why you took
them. When approaching a scene, take the first photograph just as you always
have. Then, stop and think about what you are seeing and what attracted you to
the scene in the first place. Once you identify that, make it specifically the
dominant feature of the photograph. Try to "boil down" the picture to its very
essence. Ask yourself, what is the subject? How can I emphasize it? What is
unnecessary? How can I eliminate those items? For example, if trying to take a
single blossom or flower center, eliminate all unnecessary flowers, leaves, and
background.
2. Steady Your Camera
When hand holding the camera, think of your body as a tripod. Your stance should be relaxed yet firm with feet apart and elbows tucked next to the body. The camera should be resting in the palm of your left hand with the right hand ready to fire. Tighten your body position. Don't try to hold your breath, but exhale fully and lock it out of your body. Or try a tripod - a must in low-light situations. For flower photography, opt for one that allows you to get close to the ground without reversing the center post. A quick-release device on the tripod is recommended.
3. Get A Closer, More Intimate Feeling
 The
most common photography mistake is not getting close enough to the subject. Look
at your lens and decide how close you can get without changing the focus. Move
your body closer to the subject until it is in focus. For each lens, learn its
minimum focal distance and move your body to that position. Do you always use a
50mm lens in the garden? Next time try your 200mm. A long lens causes the
foreground and background to visually compress. That's a nice effect. Explore
each of your lenses and use them at their minimum focal distance. For example,
close your eyes and smell a rose. Now do it with your eyes open. How close are
you and what do you see? Now try the same thing with your camera. Set the lens
to its closest focal distance and walk toward the rose until it is in focus. Now
you have an intimate view of the rose as well as its special fragrance. Capture
it all on film!
The
most common photography mistake is not getting close enough to the subject. Look
at your lens and decide how close you can get without changing the focus. Move
your body closer to the subject until it is in focus. For each lens, learn its
minimum focal distance and move your body to that position. Do you always use a
50mm lens in the garden? Next time try your 200mm. A long lens causes the
foreground and background to visually compress. That's a nice effect. Explore
each of your lenses and use them at their minimum focal distance. For example,
close your eyes and smell a rose. Now do it with your eyes open. How close are
you and what do you see? Now try the same thing with your camera. Set the lens
to its closest focal distance and walk toward the rose until it is in focus. Now
you have an intimate view of the rose as well as its special fragrance. Capture
it all on film!
If you want to get still closer, explore the possibility of adding additional camera equipment. Try a 2X doubler. Or consider the addition of a tube; a spacer between the camera and the lens which makes the image in the viewfinder appear larger. (Always use the be manufactured by your camera company.) With both these two additions, the 2X and the tube, less light reaches the film which you must compensate for in your exposure (or let your in-camera light meter do it for you). Or add close-focusing diopters to the front of your lens, like a filter, with no loss of light. The diopters I find best are made by Nikon and in the $70 price range. If you really want to be abstract, put them all on the camera at the same time where the only thing in focus may be the edge of a petal.
Filling your frame with just parts of a flower gives the viewer an intimate feeling. Getting this close requires supplemental equipment and a macro lens. Become intimate with your subject. Don't be afraid to fill the frame with color and texture. To help move into a macro feeling with less expense, try diopters (supplemental lenses which screw on the front of the lens) and/or extension tubes.
4. Look For the Light
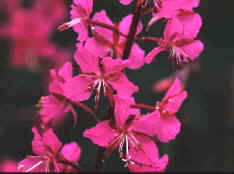 The essence of
good photography is light. Walk around the subject and learn to look for the
various kinds. You should be able to see front lighting (it looks flat), side
lighting (details and subject contours stand out) and back lighting (silhouettes
and rim light). On overcast days, flower colors vibrate. Photograph your garden
at various times day under varying light conditions. Light should be the
secondary subject of your photograph.
The essence of
good photography is light. Walk around the subject and learn to look for the
various kinds. You should be able to see front lighting (it looks flat), side
lighting (details and subject contours stand out) and back lighting (silhouettes
and rim light). On overcast days, flower colors vibrate. Photograph your garden
at various times day under varying light conditions. Light should be the
secondary subject of your photograph.
Front or side lighting tends to be less dramatic. When using kind of lighting select subjects with definite contours or brilliant colors.
On overcast days color seems to intensify. This weather is superb for shooting but use a tripod or keep your shutter speed at a higher level to assure steady and sharp images.
Light plays an important part in the dramatic effect of your photographs. Back lighting (the lighting coming toward the camera from the rear of the subject) is the most dramatic. They sparkle!
5. Let it Rain
Clinging water drops on flowers produce fascinating images. Go out in the garden when the dew Is on the blossoms or at the end of a light rain. Include a diaper or lint-free cloth in your camera bag which readily absorbs water on equipment and dries out more quickly than other materials. When out In the field on a stormy day, wipe down equipment frequently. Another tip: A simple plastic cap can cover the camera quickly between shots to keep it dry.
Raindrops add sparkling jewels to your flowers. In fact, a drop of water can become the subject of the photograph.
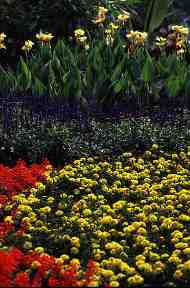
6. Watch Your Backgrounds
 Your
body position relative to the subject will determine the background. If you
tower over a flower, the background will be the flower bed and dirt. If you are
at eye level, the background may be flowers, greenery, or perhaps even sky. For
soft solid color, or black background, use your F-stop control. Instead of 1/60
second @ F16 (everything is sharp), try 1/500 at F5.6 (the subject should be
sharp with the backgrounds a soft fuzzy color). At either settings the exposure
will be the same. Remember, if you want something to stand out, use the contrast
behind it. For example, a sharp subject stands out against a fuzzy background; a
light subject against a dark: a dark subject against a light.
Your
body position relative to the subject will determine the background. If you
tower over a flower, the background will be the flower bed and dirt. If you are
at eye level, the background may be flowers, greenery, or perhaps even sky. For
soft solid color, or black background, use your F-stop control. Instead of 1/60
second @ F16 (everything is sharp), try 1/500 at F5.6 (the subject should be
sharp with the backgrounds a soft fuzzy color). At either settings the exposure
will be the same. Remember, if you want something to stand out, use the contrast
behind it. For example, a sharp subject stands out against a fuzzy background; a
light subject against a dark: a dark subject against a light.
Soft color backgrounds can be made by shooting with the lens at a large aperture (i.e. f2.8, 4, 5.6) and limiting the depth of field. The out-of-focus background becomes an attractive backdrop for the subject Focus on the subject is critical and should be very sharp. If you want a nice black background, have a friend cast a shadow behind the subject.
7. Little Critters
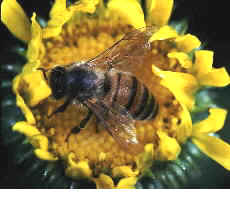 An
important part of your garden are the little critters there; bees, butterflies
and bugs. First, make yourself comfortable in long pants and a long-sleeved
shirt. Insect repellent is a must, but never use cologne or perfume sprays! You
want the critters to stay on the flowers - not you. And speaking of creepy
crawlies, they are part of what you are shooting and, whenever possible, include
them in the photo. They can be exciting additions.
An
important part of your garden are the little critters there; bees, butterflies
and bugs. First, make yourself comfortable in long pants and a long-sleeved
shirt. Insect repellent is a must, but never use cologne or perfume sprays! You
want the critters to stay on the flowers - not you. And speaking of creepy
crawlies, they are part of what you are shooting and, whenever possible, include
them in the photo. They can be exciting additions.
Critters in the garden always add interest to an image. For best results watch the critter carefully and don't crowd it. Use a long lens, extension tubes and diopters to help you get the image. Please remember, the garden is their home. Be a good guest.
8. Follow the Lines
Garden paths give the viewer an opportunity to join you on garden walks. Flower beds and rows of colors can also offer visual lines to lead you into the garden. Look for them for added interest to help lead the viewer's eye into your photograph. Lines leading into the picture help create an illusion of depth to direct the viewer's attention to the main subject of the photograph. Remember, good composition begins with the way you arrange the visual elements of design; line, shape, color, light, texture and pattern. Look for, and emphasize them whenever you take a photograph.
Lines and paths into photos can be actual or implied. The eye follows either one with equal ease. Paths and visual stepping stones can lead the eye into the composition. Good composition is essential to interesting photographs.
9. Add Some Sparkle
 Aluminum foil is
always part of my basic camera gear. It can be a wonderful reflector adding just
a little more light to the shadow side of a flower. Keep the same basic exposure
but use the foil for a bit of sparkle to the darker areas. As an example, look
closely at the photograph here of a cactus bud. The photograph was taken in
semi-overcast conditions with light coming from both directions. The stronger
light source is natural, diffused sunlight (side lighting). The light source
from the foil coming in from the right is low, reflective light. They balance
each other nicely and allow the contours and details of the flower to be seen.
It's a very subtle touch when done correctly.
Aluminum foil is
always part of my basic camera gear. It can be a wonderful reflector adding just
a little more light to the shadow side of a flower. Keep the same basic exposure
but use the foil for a bit of sparkle to the darker areas. As an example, look
closely at the photograph here of a cactus bud. The photograph was taken in
semi-overcast conditions with light coming from both directions. The stronger
light source is natural, diffused sunlight (side lighting). The light source
from the foil coming in from the right is low, reflective light. They balance
each other nicely and allow the contours and details of the flower to be seen.
It's a very subtle touch when done correctly.
By all means, do lie on the ground to take that worm’s eye view, but paper yourself and get comfortable. For example, gazanias and poppies (two of my favorite subjects) are only inches tall meaning you must almost bury your chin in the ground to photograph them at eye level. Take along a large lawn and leaf trash bag for just such an occasion to protect you from ground moisture. Or, it can also double as a windbreak by being clothespin-fastened to a low bush or sticks.
TO IMPROVE, TAKE NOTES AND LEARN FROM YOUR "MISTAKES"
To improve, take notes on what you are doing, what you are seeing, what photographic techniques you are using and, when your photographs come back, write that information on the back of each one. Making sketches in the field will help you see more clearly. Keeping track of what is successful as well as what is not, can make you a better photographer and bring some zing to your garden photographs.
Noella Ballenger teaches botanical photography for the Los Angeles County Arboretum and conducts nature photography workshops in a variety of Western U.S. locations. For more information on these workshops, contact: Noella Ballenger and Associates, P.O. 457, La Canada CA 91012. Phone: (818)954-0933; Fax: (818) 954-0910;
Home |
Nature |
Wildlife |
Travel |
Links
Works of Nature |
Sign Guestbook |
View Guestbook
Gift Ideas |
Games |
Tips
Recommend this site to a friend: