presented by Decor Photography Overview: This paper is designed for the beginner. However, the novice photographer might find this a useful refresher. The 10 topics we cover include: Cameras, Film and Film Speed, Lenses, F-Stops/Shutter-Speed, The 4 Steps to Taking a Picture, Depth of Field, Techniques for Composing a Picture, Shooting Special Situations, and a little on Portraits. |
| Objectives:
Armed with a little info, you will be able
to take better pictures than ever before. Even if you’re shooting
just ordinary everyday shots. |
| In any endeavor, even the most exciting, there is some boring stuff to get through. So it is with photography. The good news is that there’s just a little bit of boring stuff. If you can wade through these few pages, you will improve your photography and you will see more and more pictures that you like than ever before. So with that goal in mind …… |
| Cameras |
| As you all know, there are quite a variety of cameras out there. For this paper, we will concentrate on 35mm formats of which there are 2 main categories - SLR (single lens reflux) which have interchangeable lenses and then the Point and Shoots. Most of the ideas covered here will be of use to the SLR user. But first let's take a look at the Point and Shoots. |
| Point and Shoot |
| There’s a variety here – 1) Regular cameras about the size of a Walkman Radio. Equipped with a wide angle lens having, built-in flashes, and a shooting range of anything over 4 to 5 feet. Some have little zoom features and auto rewind. All these cameras read the film speed of the film you put in and there are no adjustments to be made. You simply point and shoot. 2) Disposable cameras come with film and in a little box. You never take the camera out of the box. When you’re done playing with them, you turn in camera, box, and film all together. 3) Panoramic Disposables feature an even wider angled lens to catch a still wider scene. Again you turn in the whole thing for developing. Point and Shoots have their place and can take very good pictures as long as you stay within their abilities. And that’s where most people go wrong ...... |
| The Shrink Factor: The biggest problem with Point and Shoot cameras is the wide angle lens. The nature of 'wide angle' is to take in more of the scene, side to side, than any other type of lens. This can be very useful BUT ….. these lenses also shrink the scene and everything in it. We all have pictures where we've said ... "see those little spots ..... that's the whole family". So consider the following when shooting: |
| People and Animals: Shoot between 5 and 20ft, anything over that and these subjects start getting very small in the final print ..... (little spots) |
| Scenics: Usually no problems here, but if you want just a certain peak let’s say .. it too could come back shrunk in the print. |
| Tip: Fill the frame with your subject. It’s not always easy to do but it should be your main concern each time you shoot a picture with wide angle lenses. |
| SLR Cameras |
| These cameras have inter-changeable lenses and you look through the lens to shoot. They provide controls for film speed (the ASA number), focus, shutter speed, and f-stop (aperture ring opening inside the lens). The flash unit is external and there are all kinds of attachments you can buy – 1 billion filters, motor drives for advancing the film, tripods, and all kinds of specialty lenses. They also come these days with automatic features like auto focus and many are even programmable. These cameras provide what point and shoots can not – total control for any condition or any artistic whim of the photographer. |
| When comparing quality between name brands – there is very little difference. They are all good. So almost any name brand camera will take great shots – but only if you learn the basics. Otherwise, you’re counting on luck with that expensive camera. You might as well have a Point and Shoot camera. |
| Film & Film Speed |
| There are 2 major types of film – print film and slide film. If the film’s name has ‘chrome’ in it – it’s slide film. All others are print film. Both are rated with a numbering system that indicates the "speed" or light sensitivity of the film. It also indicates the amount of grain you may see in a print or slide. Small silver crystals in the film are what capture the light when you click off a picture. The smaller the crystals (as in ASA 100) then the sharper the image or resolution you get. Ok .... sounds good ... small grain, shape image. However, small grain films are less sensitive to light and very often require slow shutter speeds. Slow shutter speeds are hard to work with requiring the use of tripods and a steady hand. Big grain films (ASA 400, 800, etc.) are more sensitive to light and allow for fast shutter speeds. But the bigger grain shows up in the print and really doesn't help the appearance of enlargements - say - 11x14 and up. So there’s a trade off here. |
How does this all
work for your day to day operations? When choosing a film consider -
|
| For Enlarging: If greater than 8x10, you’ll want a fine grain film – ASA 100 or 200. However, because of the low sensitivity to light, you will often shoot using slow shutter speeds (get a tripod). If you are not enlarging, then go with higher grain films so you can shot at faster shutter speeds – ASA 400 or 800. |
| For Fast Action: You’ll need to shoot at high shutter speeds so use ASA 800 or 1000 but you’ll have to accept some grainy appearance in enlargements (which, by the way, is quite acceptable for action pictures). |
| For Lighting Conditions: Check out the following chart: |
|
Film Speed |
Bright Outdoor |
Partly Sunny |
Overcast |
Indoor Flash |
Normal Action |
Fast Action |
Very Low Light |
|
ASA 100 |
X |
X |
X |
X |
|||
|
ASA 200 |
X |
X |
X |
X |
|||
|
ASA 400 |
X |
X |
X |
X |
X |
||
|
ASA 800 |
X |
X |
X |
X | |||
|
ASA 1000 |
X |
X |
X |
X |
| I use ASA 100 because I shoot mostly scenery and need the fine grain for enlarging prints to poster size. Using one film for most of my shooting also enables me to buy large quantities at discount prices. If I have to shoot fast action or in very low light, then I’ll buy what I need for that time - ASA 400, 800, or 1000 or I’ll use flashes, tripods and such. | ||
| How to get Inexpensive Film: | ||
| Film is sold in 2 ways: 1) amateur grade
film – rolls of 24 or 36 exposures that we buy off store shelves and 2)
professional grade film we can buy in 100 foot (30.5 meter) reels at
photography shops. The difference is the aging process. Film goes
through a color shift as it gets older. New film might show a
blueness in a print where as old film shifts to browns and oranges.
Amateur grade film is made, stored, and shipped in such a way as to be on
the shelves at the right age when you buy them. The time on this is
down to a science and almost always you will get at least decent
film. It’s also important to check the expiration dates on each roll
before you buy. Don’t buy outdated film (it’s usually on
sale). Don’t even buy film that’s close to it’s expiration
date. You might not like the results or the money you spent on the
film AND the processing. Professional grade color film can be
purchased in 100 foot rolls and you then, roll it up in reusable film
cassettes yourself. This film comes to you already at the right age
and must be refrigerated to slow the aging process to a crawl. The
advantage to professional grade film and rolling it yourself is the cost
savings … and they are big! Comparing the same number of exposures
between amateur and professional film … you will pay 3 times as much for
the amateur film.
To roll your own film, you’ll need to purchase the following: 1) a film rolling machine that cost about $15-30; 2) reusable film cassettes (the cassettes in amateur grade film are not reusable); and 3) the right tape. Masking tape or scotch tape just doesn't work. It’s very easy to learn (I’m proof of that) and the money you save on film is well worth it. Any good photo equipment shop will have these rolling machines, cassettes, and tapes or they can order them for you. Even for the person who shoots every landmark and sign on his travels or just for the family album, rolling your own film is very cost effective AND you always have the right aged, professional film. | ||
| Lenses | ||
| There are 4 types of lenses to talk about: Wide Angle | ||
| Normal | ||
|
Telephoto | ||
|
Zoom | ||
|
| ||
| All lenses are measured in ‘focal length’ - the length in millimeters (mm) of the internal focusing lens itself. This is written somewhere on each lens usually on the front. As you know, lenses vary in length within each category above. For instance, the focal length for wide angled lenses can range from 24mm to 38mm – a normal lens can range from 50mm-58mm – zoom lens and telephotos range from 70mm to 1200mm. The longer the focal length, the more magnification you get from the lens. | ||
| Wide Angle: These take in allot of the scene from side to side .. more so than with any other lens type. Because of their rather short focal lengths, they also shrink the scene. This shrinking often disappoints the photographer when the prints come back. So …. unless your subject can fill the frame or at least half the frame when looking through the camera, don’t take the shot (in most cases). | ||
| Normal: These are called ‘normal’ lenses because the render a subject at the same scale that we see the subject. Usually, these are the lenses that come with the camera. | ||
| Telephoto: These are the so called big boys. They have a fixed focal length like the other two lenses just mentioned but because of their long and extra long focal lengths, they have greater magnification too. Telephotos usually start at 100mm and continue 200mm, 300mm, and up to 1200mm or more. A tripod is recommended for shutter speeds of 250 or slower. | ||
| Zoom: A zoom is a telephoto lens that can change focal lengths and thus change magnification too. Zoom lenses are easily identified because they show a range like 70mm-230mm or 100mm-300mm. | ||
| Filters | ||
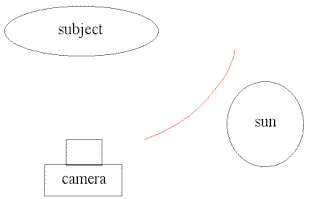
| There are more filters out there then any other photographic item. For this paper, I will only talk about the 2 you really need: 1) a UV filter for each lens and 2) a polarizing filter. The UV stands for ultra-violet and blocks the UV rays from the light source – usually the sun but it could also be the flash. Without this filter, colors on your print might be rendered just slightly different then from the real scene. The UV filter also protects the fine polished glass on your lens. If the UV gets scratched, it’s allot cheaper to replace it then your $150-$300 lens. A UV should be on each lens you have. The Polarizing filter is a very useful aid in adding to the color saturation of your final print. I use then almost all the time. As light reflects off the subject, light rays are scattered into many very fine angles. This filter allows for only 1 angle of light to pass through the lens thus reducing any glare. In doing this, the filter allows for deeper color saturation … in other words, you get richer color than without the filter. But there’s a catch to this …. the sun must be at or near 90� to the camera. In the illustration below, if the sun is pointing at the subject anywhere on the red line, the polarizer will be effective. Polarizers are made so that you can turn the filter to get the most effect possible. You are looking for the turn that gives you the darkest blue sky or takes the shine off the water or cuts the glare off windows. | ||
|
| ||
| There are 2 kinds of polarizing filters –
linear and circular. These designations refer to the glass of the
filter and not the shape of them. Use a circular filter if you have
auto focus lenses and linear for all other types of lenses.
Again you’ll need a UV filter for each lens but you may be able to get by with just 1 or 2 polarizing filters – this will depend on the barrel size (the diameter of the glass on all your lenses) of your lens. My normal and zoom lenses are the same barrel size so I bought only 1 polarizer to use between them. | ||
| F-Stop and Shutter Speed | ||
| OK .. now let’s look at the two lighting controls you have to work with … the F-Stop (aperture ring opening inside each lens) and the Shutter Speed. They work together to make the proper exposure on the film. After you have composed a picture through the lens, and after you have adjusted any filters you may have, you then look at the light meter reading. The meter reading is displayed in many different ways depending on your camera but it’s always seen through the lens and in some way informs you of F-Stops and/ and Shutter Speeds. | ||
| F-Stop: | ||
| Found on the lens itself, it’s a
measure of the aperture ring opening inside the lens you are using. The
aperture is a black ring inside each lens that can be
adjusted. It allows
an ‘amount of light’ to enter the lens. It’s an important to make the
distinction of ‘amount’ when compared to the
shutter speed which is a measure of ‘time’ the
light enters the lens. You can see the aperture by holding up any lens - look through it
as you move the F-Stop ring … you’ll see the aperture get smaller and
larger.
The aperture also controls the depth of field. Depth of field is what’s in focus from front to back in a picture … more on that later. The numbers used for the F-Stop might look like this on the regular lens – 1.4, 2, 2.8, 4, 5.6, 8, 11, 16. Each of these numbers is twice the amount of light than the one ahead it. So f/4 is twice the light that f/5.6 is. Going up the scale makes the aperture smaller and letting in less light. | ||
| Shutter Speed: | ||
| The shutter speed is how fast your camera’s
shutter opens AND closes. It’s measured in factions of 1
second. If you look at the shutter adjustment on your camera, you
will see a range of numbers that might look like: B, 1, 2, 4, 8, 15, 30,
60, 125, 250, 500, 1000.
B stands for Bulb – the shutter stays open for as long as you hold the button down. 1 stands for 1 second 2 stands for � second 4 stands for � seconds and so on. You can see that the 1000 mark (1/1000 of a second) is very fast. Mathematically, each click on the shutter adjustment is equal to 1 full f-stop click. They work opposite each other and together they set the exposure that the film receives when you fire off a shot. Shutter speeds are important for several reasons. If you are shooting fast action you need to shoot with fast speeds or everything will be blurred. If shooting in low light, you need slower shutter speeds to allow enough of that low light to hit the film otherwise you won’t see much in the print. You can use f-stop/shutter speed combinations to help out. Remember they work opposite each other. Opening up the aperture to a lower f-stop setting and let in more light. This allows you to adjust for the correct exposure with a faster shutter speed. | ||
| Depth-of-Field | ||
| This idea is easily overlooked by many
people. Depth-of-field is how much of your print is in focus from
the foreground to the background. There are times when you want less
depth-of-field with just a small portion of the picture in focus – say a
person or animal and other times when you want everything in focus – say a
scenic shot. There are 3 things that affect the depth-of-field: 1)
type of lens – the longer the focal length the less
depth-of-field – so zooms have less depth-of-field than a normal
lens. 2) With any lens, the closer the photographer gets to a
subject the less depth-of-field you get when you
focus. 3) Depth-of-field can be controlled with the f-stop setting
on any lens – the smaller the f-stop number the less
depth-of-field. There’s a rather odd numbering system for the
f-stop ….. the smaller the number on the f-stop ring …. the larger the
aperture opening inside the lens and the less depth-of-field.
Wow .... that's easy to mix up. OK ..... so going from f/8 to
f/4 makes the aperture ring larger letting in more light. Also going
from f/8 to f/4 gives you less depth-of-field.
Remember: changing the f-stop changes 2 things - the amount of light AND the depth-of-field. You’ll need to play with this a little and make it a point to understand the relationships that effect depth-of-field. Make sure you think of how much depth-of-field you want before you shoot. Suppose you what the most depth-of-field you can get …… set the f-stop to a high number. This gets everything in focus. For less depth …. set the f-stop to a small number. Either way you move the f-stop, you will have to adjust the shutter speed to get the correct exposure displayed in your light meter. This understanding, along with the other techniques to follow, will make a huge difference in the outcome of your prints. | ||
| The 4 Steps of Taking a Picture | ||
| Just 4 little steps. Sounds simple enough doesn’t it? Well, it is .... and here again, I’m proof of that. I would remind those with Point and Shoot cameras, that not all these techniques will be available to you but the rest can be of value. | ||
| 1) Compose the picture in the view finder of the camera. Move the camera around, switch from horizontal to vertical, move yourself, change lenses – whatever will fill the frame. | ||
| 2) Adjust your polarizing lens if you are using one or any other filter. | ||
| 3) Determine the of depth of field you want for this shot. Lots of depth – higher f-stops. Short depth of field – lower f-stops. | ||
| 4) Adjust your shutter speed so your camera’s light meter reads for the right exposure (use a tripod if shooting at low speeds) and take the shot. | ||
| NOTE | ||
| Steps 3 and 4 are interchangeable. If shutter speed becomes the prime concern as in action shots, then shutter adjustment is done first to get the fastest speed you can shoot and then the f-stop to adjust for proper exposure. | ||
| Techniques for Composing a Picture | ||
| Most amateurs look through the lens at their subject, center their subject and take the shot. But here we’ll show you there’s lots more that can be done to improve each shot. Here is a list of composing techniques – practice them. | ||
|
| ||
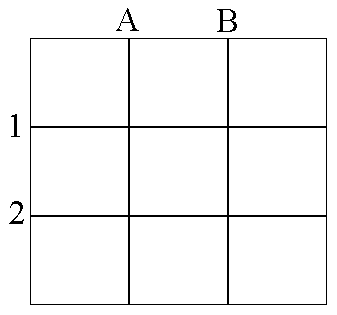
| Rule of Thirds: This is the most important of all the techniques listed. As you look through the lens at your subject, break-up the frame into thirds – both horizontally and vertically as shown in the grid below. Then place the subject on one of the four lines. This takes your subject off dead center and makes for a more interesting picture. For instance, when composing for people you might line them up on line-A or B where as for mountains, you might align them on lines-1 or 2. | ||
|
| ||
| Here are some examples: | ||
| ||
| The tree is on line-B, the sun on
line-2 and A. This alignment is so much more interesting than if it
were all centered. When shooting people or animals, the face is the
focal point so put the face on one of the interior lines as in Juli's
picture above. Juli’s face is on line-1. If you’re doing close
ups then the eyes are the focal point and you would place them on one of
the interior lines of the grid.
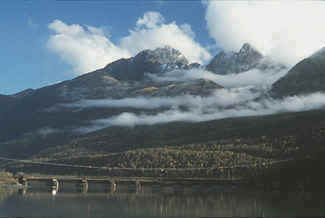
The two mountain peaks below are on line-1, AND the right peak is on line-B. The green hills right behind the bridge are one line-2. If the peaks were centered, it would be ok but not nearly as good as it is now. | ||
|
| ||
|
| ||
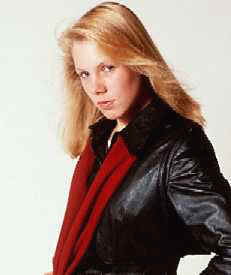
| Space in front of the face: Compare the photos below. Which looks better to you? In the first picture, Juli looks like she’s crammed up against a wall or something. Her other picture, gives her and the viewer some breathing room. Always give space in front of the face. Memorize that little line – space in front of the face. | ||
| ||
|
| ||
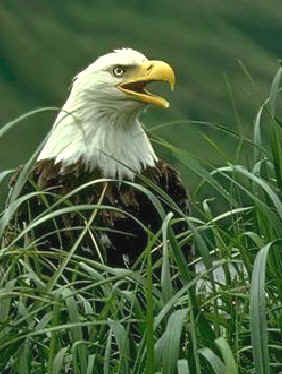
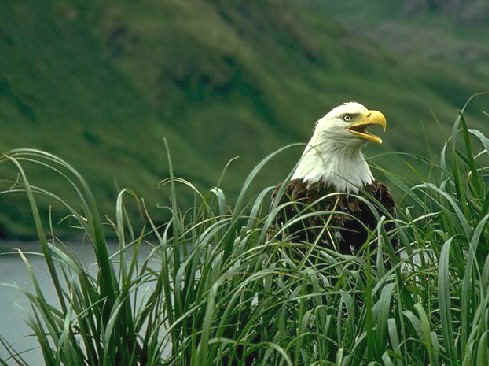
| Fill the Frame: This is probably the biggest weakness amateurs have. As you look through the lens, zoom in or move yourself so that your subject is filling up the frame or at least half of the frame. Use the space you got. It’s far more interesting than a picture with a small subject and lots of SPACE! | ||
| ||
|
Check out these eagles. Not only can you see your subject so much better when you fill the frame but the shot’s much more interesting. This idea of filling the frame is very important and especially with wide angle lenses. This means you too, Point and Shoot Cameras. Wide angle lenses take in a wider angle of the scene. But they also shrink everything. The image you see in the camera is going to be smaller in the final print. Make this a part of your thinking ….. no matter what camera … no matter what lens … fill the frame! The flaws of the eagle on the right are - not filling the frame and there’s not enough space in front of the face. The space behind the eagle’s head is disproportionate to the rest of the picture. | ||
|
| ||
| Framing: The idea here is to surround or frame your subject with something in the scene. We all have seen pictures of a mountain peak, home, or building as seen through a whole in the branches of a tree. Anything can work as a frame for your subject – fences, buildings, bushes, windows – just anything that has a hole in it and allows you to see your subject. | ||
|
| ||
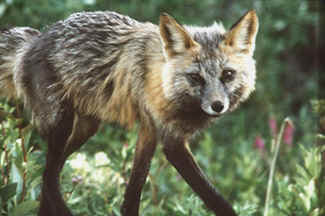
| Selective Focus: This popular technique throws everything out of focus except the subject. This method draws a lot of attention to your subject. In the picture below, the fox is the center of attention and is accented even further buy the background being out of focus. Selective focus can blur out an unwanted busy background that would otherwise blend to much with the subject. | ||
|
| ||
| You can get this effect with Depth-of-Field by 1) getting close to your subject, 2) Use a zoom or telephoto lens, or 3) change the f-stop to a smaller number (open the aperture wider) - to do this, look through your camera, open the f-stop to a smaller number, and adjust the shutter speed until your light meter is lined up for the correct exposure. | ||
|
| ||
| Simple Backgrounds: Move yourself around the subject so as to make a simple background if possible. Any background lines that seems to run into the subject or backgrounds that are too busy or other objects in the background that might pull your eye away from your subject … are all to be avoided. Your picture will be so much better if you take the time to consider the background for each and every shot. | ||
| Shooting Special Situations |
| Subject is in Shade: Examples - your subject is under a tree or maybe sitting on a porch that is in full shade. Your camera's light meter can be fooled by this ...... soooo..... take a picture at your camera’s meter reading and then open the f-stop one more stop (go to the next smaller number). Or set the shutter speed slower by 1 click. This will insure the right amount of 'shadow light' is getting to your film. |
| Backlighting: Your subject is backlit when the
light source is behind your subject. For example: your subject is
standing in front of a window inside your house.
The light coming in is very bright. This type of lighting can also
fool your light meter. The meter sees this bright light that is
radiating all around your subject and gives you a false reading based on
that brightness. So to fix that … just open your f-stop one stop …
maybe even two stops. Another way is to set the shutter speed one or
two numbers slower.
Now why pick the shutter speed over f-stop to adjust for the conditions above? …… you may need all the depth-of-field you can get. Keep the F-Stop where it is to maintain depth-of-field and adjust the shutter speed to get the correct exposure. |
| Shooting
Snow: Here again, the intense brightness of light
reflecting from the snow can fool your light meter. As a general
rule, when reading off the snow, take your meter reading then
overexpose (+) by +.5 stop, +1 and +1.5. Usually, the +1
exposure is the one that looks right.
Contrast can be a major problem when photographing people or animals in snow scenes. Take a reading directly off the subject if you can and underexpose by .3 to .5 stop. If you can't, take a reading off the snow and open up 1 stop. A polarizing filter is good for eliminating reflections from snow. |
| Shooting a City Landscape at Night: You need to test your favorite film for the right shutter time for this situation. So …. for your film …. try shooting the night scene starting at f/8 for the aperture and for the shutter … start with 8, 4, 2, and 1. Then set the shutter to B. This keeps the shutter open for as long as you hold the button down. Then count a shot at 2 seconds, 3, and 4 as well. Using a tripod is mandatory. Also consider a cable release – a cord that screws into your shutter button and you push the end of the cable which then clicks the shutter. Whatever you don - don't move the camera in the slightest way. |
| Shooting Fireworks: Set your lens to f-8 and shutter to about 125. The fireworks are such a bright light that you can get great shots with these settings. Maybe even try a 250 shutter speed. |
|
NOTE |
| Bracketing: This is a technique that helps ensure you get the right exposure. Your camera’s meter reading is an average of the light it sees throughout the scene. Often it can lie to you and give you slightly wrong settings for the f-stop and shutter speeds. In order to ensure the proper exposure one should always bracket the shot. In normal lighting you would take 3 shots …. one shot at the meter reading … then one shot that over-exposes and one that under-exposes. You can do this with the f-stop by clicking one stop over then one stop under. In the above special lighting situations … take one at the meter reading and one stop over then 2 stops over. |
| Portraits |
| There are a few
ideas here to remember when shooting people indoors as in portraits … and
especially when using a flash.
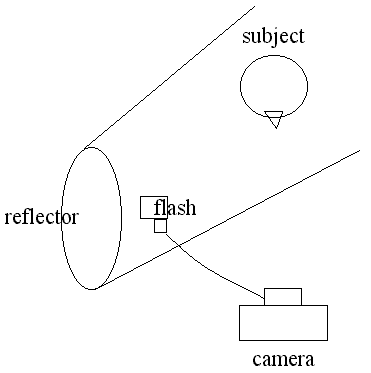
1) Keep the subject away from the wall by at least 6 feet – more if you have the room. This cuts way down on the shadow behind your subject. 2) Use a simple background for most shots. 3) Avoid direct flash. This is a straight line from the flash to the subject. It leaves either harsh shadows or a totally flat face - in either case it is uncomplimentary. Direct flash tends to cause the red-eye in prints. Instead, bounce the light from the flash by pointing the flash into a white umbrella that is facing the subject at a 45� angle as in the picture below. This classic position is an excellent way to start. And any white reflecting item will do – white poster board, a white bed sheet, a white wall, even holding the flash at arms length from the camera would be better than direct flash. |
|
|
| 4) Have your
subject move their face back and forth and up and down as you look for the
most pleasing look.
5) Features to watch out for because the camera is unforgiving :
6) Remember – space in front of the face if there's any profile at all. 7) Lenses for portraits: for 35mm cameras, the good portrait lens is around a 135mm telephoto. The normal lens will also do very nice. If you get into portraits you might consider a softening filter that screws on to front of your lens. This will soften everything by slightly fuzzing the focus ... just a little bit. |
|
|
|
Well that's it ..... congratulations ... you passed! |
|
|
| We at Decor hope these tips will help you get more fun and enjoyment out of your photography … and that more and more pictures ‘turn out’. Certainly there is much more detail to photography then one can explain in a ‘tips’ paper ….. but if you practice these ideas …. eventually you will make them a part of your photographic eye ……... even if you are Aunt Jenny, shooting the nieces, in front of a big ‘Welcome to Anchorage’ sign along the highway. |
| Sincerely, |
| Steve Kelly and Juli Kelly |
Recommend this site to a friend:
|
|
|
|